|
|
|
1.Create a blank image and fill the background with black. Press X on the keyboard (to flip colors) and then select the Type Tool type whatever you want, press OK . Make a copy of this layer and hide it (you'll need a copy later). By default, text layers in Photoshop (since version 5) are dynamic you can go back any time and change it. For this particular effect to work, we'll need to make our text "un-dynamic"... er if that's a word. Simply right-click on your text layer and choose "Rasterize Layer" (or alternately, you can CTRL + click on the text layer to make a selection out of the text, and fill that selection with white on a new layer - make sure to delete the editable text layer afterwards if you do this). Note: be sure your text is exactly how you want it first, since you'll have to start over with another copy of your dynamic text layer if you change your mind. To center the text on your image, press CTRL+A » CTRL+X » CTRL+V and then press CTRL+E to merge the text layer into the black background layer. For the "Wind" filter used in the next step, your text must be merged with the background.
 3.The next step is to repeat the same process we applied to the sides, but this time to the top and bottom. Since there isn't a "top or bottom" option in the wind dialog box, we will turn the image itself around. Use Image » Rotate Canvas » 90 CCW . Apply the wind just like before, two on the left and two on the right. When you have completed this task, use Image » Rotate Canvas>90 CW in order to straighten your work up. 
5.Convert the image to Grayscale by using Image » Mode » Grayscale and then to Image » Mode » Indexed Color . The next step is to give our image some color, so choose Image » Mode » Color Table . Since we're shooting for a "fire effect" choose the Black Body table. 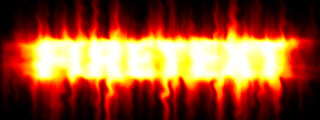 6.Well our text is now engulfed in a firey furnace of sheer... hottness... but all that heat does make it a tiny bit difficult to read. Remember how I told you to make a copy of your original text layer back in Step 1? Unhide that layer now and drag it to the top position in your Layer Palette. And now you have a solar eclipse or at least legible text, and that's almost as good!  |
Archive : 21st February 2007 - Starburst glints of light, 22nd February 2007 - Glossy Photos , 23rd February 2007 - Four Way Fire , 24th February 2007 - Aging a woman’s face, 25th February 2007 - Raining Effect , 26th February 2007 - Make a photo to a statue , 27th February 2007 - Making a Web Photo Gallery, 28th February 2007 - Colorization from Black and white photo |
|
|
|||||||||||